понедельник, 8 июля 2013 г.

Lesson#5-Blending Texture on Body Part Tutorial

Blending Texture on Body Part Tutorial


1. Here are two pictures on which we will work.


2. Put a picture of a texture over the face and set him 50% transparency so that you can adjust the scale and see how the texture coincided with the face

3. By setting the paper as shown in the picture, you will avoid the problems that may arise later. Apply a layer mask to the texture and set the low transparency to see through her ​​face and hide the brush that part of the texture of the mask that is out of the face.

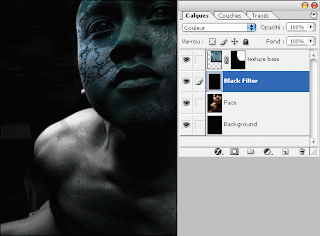
4. On top of the face (between the face and texture), add a blank layer, fill it with black and set the transparency of Color. Performing this operation, the face becomes black and white, but it will retain its color, thus you will have access to the original color of the picture, if needed later.
Now go back to the texture layer and set its blending mode to Multiply at 100% opacity.

5. Duplicate this layer, texture and set its blending mode to Color Dodge 80% transparency. You can make this layer more transparent, if you want to end up with a less saturated result.

The next step is often used, but not always - a distortion of texture. Sometimes the result is really fit, but sometimes not. The author proposes to use the following procedure at your discretion, these manipulations he personally did not apply to the lesson. And most importantly - the distortion of the texture should be done before you duplicate it ie to step 5. (first you distort the texture layer, and only then apply it to step 5.)
Thus,
a) create a complete copy of the file by clicking on the button shown on the picture in the History panel

b) on such copy unite all the layers except the face, then go to Image> Mode> Greyscale, when the window that appears, click on Flatten and save this image as a file PSD. (Usually save it to your desktop named "displace.psd"). Then close it and go back to your main file.

c) Make sure that you are on a layer of texture, unlock (unlock) the layer mask and go to Filter> Distort> Displace ... set the parameters:
X-10% Y-10% and click OK. Next, locate the file that you saved earlier and select it. See whether you will like the result, it all depends on the type of texture, if you will seem flat result of volume to inject a little texture.

The left image shows the result after applying the Filter / Distort / Displace, and on the right the original texture.

6. Now artistic additions
Each work on the texture of the most difficult - is to keep the volume. Once you mix a flat texture you lose volume, now we'll get him back))
Photoshop is a wonderful tool for this that you see in the picture.

Most used - this is the first two Dodge Tool and Burn Tool. Both tools use a 40% maximum transparency. 
(I will not describe this step in detail, flat on your sense of volume, but I suggest you look into the face of the original image, especially the nose and mouth to explore the shadows and highlights and try to imitate their tools.) This operation done on a new layer. 
In the picture shows the result. 

If you still failed, the next step will be easier

7. To make the most of your texture, density, especially if it is out of the rock / stone / sand give it a distinctiveness. Install no more than 20% of the Sharpen tool and a large brush go over the whole image. You will see how the picture became clearer, then take a smaller brush size with the same transparency (20%), and try to express how some parts. Just be careful not to disturb the appearance of the image quality of the image pixels is not desirable in this case, the action will be canceled superfluous noising. If necessary, use the Blur Tool
Наложение текстуры на части тела *

Result (right) after applying the Sharpen
Наложение текстуры на части тела *
8. And now the most interesting part of the process
You can adjust the levels, brightness and saturation of this option (red arrow)
Note translator: I'm here with the author does not agree, I think he meant no Layer Style, and the New Fill or Adjustment Layer. (I highlighted red box)
Наложение текстуры на части тела *
It all depends on your perception of art

9. This step is optional, depending on what kind of result you want, but the author considered it important to describe this step. As for the Displace make a copy of your file, merge all layers in the Layers> Flatten, and then go to Filters> filter gallery. Over time, you will feel what filter is best suited to your work, the author often uses Neon Glow, which gives the picture a certain effect, "surrealism", or Plastic Wrap or Ink Outlines, when there are some problems associated with the achievement of volume. At the moment, try Neon Glow with the following settings:


Наложение текстуры на части тела *
Then drag the finished picture to your master file and place it on top of all layers, play with opacity and layer blending modes. The author does not insist on any particular mode, relying on your taste, but advises to set the opacity to 30%, in order not to block the texture and volume of the lower layers. You can also add a mask to this layer and partially hide it, for example leaving only the eyes.
Наложение текстуры на части тела *
that's all thank you all for watching.

Lesson#4-Blaster

1. Create a new image, 500px x 500px.

2. Fill the background with black

3. Under the Brushes search for it in Assorted Brushes:


4. Select this brush here, but make it the size of 32 instead of 150 pixels:

5. Create a new layer and place it on top of the black layer and click the brush in the right corner:


6. Then go to the menu Edit> Transform> Distort and create something like this here:


7. Select the Gradient Tool, with the following settings:

8. On a new layer with the Gradient Tool, draw a thin line like this. Then, using the Rectangular Marquee Tool, make a small selection and press Ctrl + Shift + I:


9. press Delete

10. Now, using the Smudge Tool, smudge one of the ends of the white line

11. Now, changing your hand at these:

12. Make a new layer on a long thin line
Now, Filter> Distort> Wave
Use the same settings there and delivered.
Duplicate this layer and flip it horizontally (Edit> Transform> Flip Horizontally)
Now, select the top layer and press CTRL + E to connect the two layers.
Press CTRL + T and put these wave-like pieces correctly:
Connect in the same layer with the beam with a wave-like-these-pieces

13. Gradient Tool, set the settings such:

14. Now go to Layer> Add Layer Mask> Reveal All

15. Using the Gradient Tool, swipe from bottom left to top right (from the end of the beam to the base). If you did everything correctly, your work should look like this:

16. Stay on the same layer on which you mask
Select a brush:

And apply it to the bottom of the blaster.
Then click here this brush:
And apply it to the line.
Your work should look like this when you're done:

17. Make invisible layer with a black background (click on the "eye")
Press Ctrl + E to seal all visible layers
Double-click on this layer and add an Outer Glow effect with the following settings:

18. That's what we've got:

19. To add color, connect all the layers, so that you will have only one layer.
Create a new layer and place it on top of the first.
Use the Gradient Tool and make a few multi-colored fillings by Ray.
Then set the Blending Mode to Color

my result


воскресенье, 7 июля 2013 г.

Lesson#3-The effect of the lens in the Text

Hello! A great big hello to all!

I recently had the opportunity to do text with lens effect. Did ... the project has passed and now very joyful.


Today we will try to make this effect.
Glass text reflecting and distorting .... So there!


 Let's get started.

Step 1.

First we need to open any image that will be the background. I took a standard known to all enterprise Windows wallpaper.

 Step 2 .

Create a new layer and fill it with white.
And write some text on it in black.
WARNING! We'll need a very dense and rounded font. We will do it from standartonogo Vindovstkogo. If you have a similar, this step can be skipped.

In general we take the standard simple font and apply to it the Style >> Layer Style >> Stroke
There will need to install the black color and 25 pixels. More no changes are necessary.
After that hide all the layers except the text, create a new layer and hit CTRL + SHIFT + E, to be drained.

                                               Step 3.


To apply the resulting layer
Style >> Layer Style >> Inner Glow
with these settings
   And then Style >> Layer Style >> Bevel and Emboss
with these settings

 It should look like
  

Step 4.


Now again hide all layers except the text, create a new layer and hit CTRL + SHIFT + E, to be drained.
After that, back to doing all layers visible.
Name the layer with the text "1".
Duplicate it and duplicate call "2".
A layer of "1" while it is possible to hide.
But to the "2" is applied
Filter >> Blur >> Gaussan Blur
(2.0 px)
And then save the document as a. PSD

Step 5.


Hide all layers except the background.
Duplicate the background and apply the duplicate
Filter >> Distort >> Displace
There's value set 5, more than 15 do not need to change anything.
We press the OK button. And in the window choose, you just saved the document.
Get like this.


Step 6.


Select the "1" (CTRL + Click on the layer "1").
Choosing a duplicate of the background still selected.
And copy the selected part of a duplicate of the background.
Now duplicate the background can be removed.


Step 7.


Remove the white layer and "2".
Be Only layer "1", the background and a piece of duplicate background.
Now select the layer "1" and apply it to the mode "Overlay" (Overlay)


 Step 8.


To get the text that apply
Filter >> Render >> Lens Flare
There's no change, and only put the source in the center of the text.
The next time was on this forum, and more than once.
Style >> Layer Style >> Stroke (10 pixels, stroking gradient, which like it. I took the gold)
Well, then
Style >> Layer Style >> Bewel and Emboss

 And here it is! The long-awaited results!


Thank you for your attention. Good luck to all!


Lesson#2-Realistic Flag

Lesson#2-Realistic Flag

I'll teach you a simple and fairly realistic technique of the flag in Photoshop.
First find the texture of fabric, which will be displayed our flag.
In this embodiment, this silk.
I - love the texture of silk, so he is going to use it. Open any fabric texture in Photoshop.

 Then desaturate it by pressing CTRL + SHIFT + U. We need a texture black and white.

Install a higher contrast by pressing CTRL + L, and indulge in the settings. It should look something like the picture. Then use a filter Filter> Blur> Gaussian Blur with a setting 3.5 - 5.

 In this file, we need to have only one layer (remove the excess layers, if you have them)
Then, save the black-and-white contrast flag map named in the format psd. Next, press CTRL + Z, not to return to the contrasting flag.
 

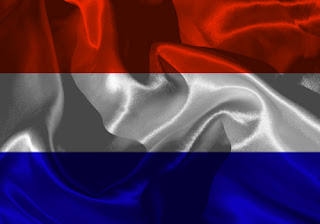
I will use the Dutch flag
 Create a new layer above the discolored flag. There we can copy the flag of any country, or to draw it. Change the blending options for multiplication (MULTIPLY), and reduce the opacity.
  This flag is realistic enough, but it is not twisted, as the fabric itself, so we have to bend it.
Click on the layer with the picture of the flag (not its texture), and then select Filter> Distort> Offset (Filter> Distort> Displace). Make the settings as shown in the picture, but the vertical scale and horizontal scale you can zoom to a greater distortion or decrease - for less. Remember the file PSD, which we have done in the past? He will be our displacement map.


   Here it is ready!